
to Create QGIS Atlas Mapbooks

Put Your Mapping in Auto-Pilot with QGIS Atlas
Like a modern-day mechanical mapping machine, you can automate your map output.
For 99% of us, there are 2 surefire ways to create mapbooks:
1. ArcGIS Data Driven Pages
2. QGIS Atlas
We’ve reviewed pumping out maps with ArcGIS data driven pages. Esri’s data driven pages works great. It’s solid.
But today we want to examine an equally-effective method with a QGIS Atlas tutorial.
Why use QGIS Atlas?

The QGIS Atlas is a true open source technique to generate hundreds of maps in minutes. In the map-making business, this means being efficient without compromising art and intricacy.
QGIS’ Composer has the ability to create an “Atlas” built-in. In open source QGIS software, before version 1.9 it used to a plugin. Now, it’s integrated into QGIS core.
All you need to do is select a map layer containing geometries as your index layer. Each geometry in the index layer is used to create each individual page. QGIS Atlas dynamically changes the view extent to each feature in the index layer. Save tens, hundreds or thousands of maps as a single PDF or separate images.
There are tons of options to customize your map output. Let’s get our feet wet with a QGIS Atlas tutorial.
How to Create a QGIS Atlas Mapbook
Let’s use the the Natural Earth populated places layer. We have 4 records in the attribute table with point locations of New York, Los Angeles, Chicago and Houston.

This means QGIS Atlas will generate 4 pages because there are 4 locations. If you have 1000 records, QGIS Atlas will produce 1000 pages.
Step 1: Create a new composer window
Click File > New Composer
QGIS Composer is where you set up your map output.

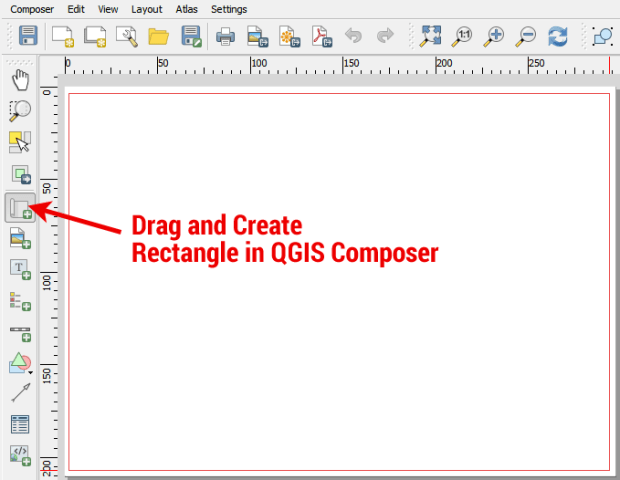
Step 2: Add a new map item
In your new QGIS Composer, select the New Map Item tool. Drag and create a rectangle in your Composer map canvas.
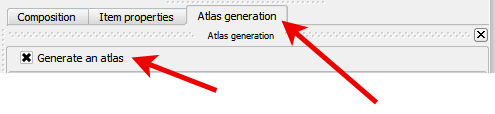
Step 3: Click “Generate an Atlas” in the “Atlas Generation” pane
In the right-pane, check the box “Atlas Generation”
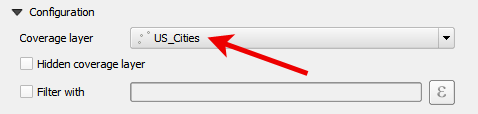
Step 4: Choose your coverage layer
Your coverage layer is the index layer. It is used to create each individual page. QGIS Atlas dynamically changes the view extent to each feature in the coverage layer. The number of records in the coverage determines how many pages will be in your mapbook.
We have the 4 most populated cities (New York, Los Angeles, Chicago and Houston) in our index layer. This means our mapbook will output 4 pages.
Step 5: Select “Controlled By Atlas” in “Item Properties”
In the “Item Properties” tab, check the box for “Controlled By Atlas”

Step 6: Export QGIS Atlas Mapbook
Click Atlas > Export Atlas as PDF

Result: QGIS Atlas Mapbook
The result is a 4-page PDF of each feature in the index layer. New York, Los Angeles, Chicago and Houston are dynamically displayed with very little effort by the cartographer.

The Nitty-Gritty Details in QGIS Atlas
QGIS Atlas has additional functionality for you to customize your mapbooks. The set up and possibilities are endless, in a good way.
QGIS Atlas Preview Toolbar
We love the way you can preview mapbooks using the QGIS Atlas toolbar. It’s a unique for you to get a feel for how the mapbook will look when exported. Push the Preview Atlas button to enable this feature.
From there, you can flip through the pages of your mapbook one-by-one. Here you can export as SVG, PDF or images.

Customize your Exports Uniquely
What will be the file names of your maps or mapbook? The Output Filename Expression controls the file names of your export.
When you check Single File Export When Possible , the output PDF file will be in a single PDF. When this option is not checked, the output will be separate PDFs.
How will the mapbook be sorted? This can be controlled using the Sort By and dropdown.

Delve into Scales and Margins
In the Item Properties pane, you must select Controlled by Atlas . With a polygon feature as your coverage layer, you can set up margins around the feature. This means that the scale will dynamically adjust itself.

For example:
When you set up 10% around the continents polygon, this is how much margin will be around each feature. Here is how the continent of Africa will look with a 10% margin:

Africa continent with a 10% margin
Here is Africa with a 50% margin:

Africa with a 50% margin
Generate Dynamic Text and Dynamic Everything as Labels
Dynamic text is a label that updates automatically based on a property of a map. If you want to dynamically label a city name in your map, click Add New Label . Under Item Properties , click Insert an Expression .
Under Fields and Values , double-click the field you want to dynamically be displayed in the map window. The expression will be similar to [% “NAME” %] :

QGIS Atlas has its own list of functions that can be added as labels. This includes everything from the feature number to the number of features in the mapbook.
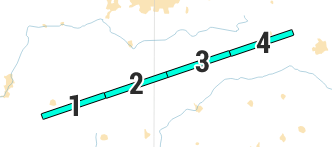
Pull Off a Strip Map Along a Line
Okay, the header is deceiving. There is no strip map tool in QGIS.
But if you want to use QGIS Atlas along a line, all you have to do is split it into segments. And there is a tool to do that in GRASS. The v.split.length function splits the line into equal segments defined by the user. This means that QGIS Atlas will generate maps for each line segment.
Final Thoughts on QGIS Atlas
QGIS has its own little map-making factory and it’s called QGIS Atlas. Hundreds of mapping monkeys would have a hard time competing with this well-oiled machine. Automation is becoming key in a world begging for spatial answers instantly.
QGIS Atlas is gaining steam. With a little bit of practice, and this QGIS Atlas tutorial, you have the necessary tools to build your own atlas with authority.
Map with confidence. Map with speed. Map with automation.
QGIS Atlas is the only robust open source option to generate beautiful maps without compromising cartography.
What do you think of QGIS Atlas?
Let us know in the comments below.
Source
Δεν υπάρχουν σχόλια:
Δημοσίευση σχολίου